top of page

Section 6: Studio Design
Section 6: Studio Design: Welcome
Contents
Introduction
1. Marketability
2. Operational Structure
3. Location
4. Common Studio Requirements
5. Room Dimensions
6. Acoustic Treatment
7. Equipment
Conclusion
Section 6: Studio Design: Text
Introduction
Section 6: Studio Design: Text
The purpose of this is to design a hybrid studio from home and commercial studios that will compile their advantages for its design.
A budget will be considered being that it is a major influence on the studios in the real world, thus for this work there will be no let limit to a budget but rather the cheapest and most effective options will be taken. (Robair, 2012; Lefford & Thompson, 2018)
Marketability will also be a major factor into the design of this studio as modern producers and audio engineer face financial struggles and need to have an entrepreneurial mindset to make money and get custom, so a studio that would cost 1 million pounds to create that is based in a country side 20 miles away from anywhere would not be very marketable due to expenses needed to create such a studio and the location would be poor as it would be a struggle for anyone to even get to the studio. (Walzer, 2016; Burgess, 2008; Wilson, 2011)
Operational structure, location, common studio requirements, and room dimensions are interlinked as they all effect each other’s effectiveness and outcomes. For example if the location is great but the studio would only be a singular room then it would be make more difficult to make a live room, which negatively affects the operational structure as everything will be within one room; if the room was also small then it would have an unbalanced frequency content. (Bell, 2014; Camilleri, 2010; Long, 2013; Everest, 2015)
Location is important as it determine the expense of hiring the space, the accommodations for clients, and how easy it is to travel to the location. It is worth noting that HQstudios has a section on their website that details such locations like the train station, hotels, and restaurants (HQstudios, 2021)
Operational structure is important as it effects the workflow of the studio and the outcomes of the studio sessions. For example, a studio with a live room has a better operational structure due to the recording equipment and instruments being separated from the control room where the mixing, and critical listening takes place. (Camilleri, 2010)
Common Studio requirements are considered to the requirement effecting the overall quality of the studio as a critical listening and recording space, plus it also effects the overall marketability and accessibility for potential clients, as perhaps a handicapped individual wants to record their music at your studio but without a handicapped access route it might put them off or force them to look elsewhere. (Long, 2013)
Room dimensions are very important as it is the first step when trying to achieve a balance frequency content for your studio, as small, multiple, and/ or doubled room dimensions heavily impact the rooms critical listening effectiveness negatively, it is also very difficult to overcome these issues with acoustical treatment without sacrificing the rooms size, so it is always best to get the best room dimensions possible. (Everest, 2015; Newell, 2017)
Acoustic Treatment is an important step after determining the room dimensions it allows for the correction of any potential frequency issues within the room and focus the rooms into their respective roles, for example the control room are generally quite absorbed with not reflective to minimize reflected sounds interfering with the direct sounds from the monitors whereas the live room will be fairly reflective to allow the musicians to feel comfortable to record, but also the reverberation within the live room will be tailored to sound beautiful but also reducing the potential issues of reverberation, for example having the room fairly absorptive at 500Hz and below to remove the issue of low frequency content becoming muddled and unintelligible. (Everest, 2015; Newell, 2017)
The last consideration is Equipment, which is very important as it determines how the music will be recorded and whether the studio has a unique selling point/ timbre when music is recorded and mixed there. (Bell, 2014; Robair, 2012; Taylor, 2015; Lau, 2012; Zoran & Paradiso, 2011)
The estimated outcome of this section will be a studio design that is an effective combination of all the advantages both home and commercial studios have and will be an effective step forward into studio design for potential future studio owners.
Section 6: Studio Design: Text
1. Marketability
Section 6: Studio Design: Text
This hybrid studio will follow the design philosophy of commercial studios and be a studio that is built around accommodating any kind of musician, this in turn will maximize the amount of clients this studio can have resulting in a more successful studio. This accommodation design is based around the interview section of this work and Bell (2014) and Lefford & Thompson (2018) articles.
The main design elements that will considered to reach maximum marketability will be location and equipment as if the location is situated in a convenient place then it allows for musicians to make use of multiple methods of transportation rather than car or taxi if the studio is unreachable any other means. The equipment will be diverse enough to allow for different methods of recording, for example having enough microphones, and a mixing desk large enough to record a full band at the same time if that is what the musicians want. The only type of musicians that will not considered is orchestral groups as that would require a very large room, as well as a mixing desk with a lot of channels. (Bell, 2014; Robair, 2012; Lau, 2012)
Section 6: Studio Design: Text
2. Operational Structure
Section 6: Studio Design: Text
Since the structure of a studio is important for workflow and how it impacts the musicians within the studio then it is worth considering designing to have a studio that is streamlined in its production, like HQstudios everything will be within arms reach and ready to go without or with very little set up required. It is also worth considering having different rooms for different purpose, like a live room to record the musicians, a storage room for equipment, kitchen for the musicians and engineers to have a break, bag/ coat room to keep clutter outside of the control room and live room. (Camilleri, 2010; Long, 2013)
It is also worth noting that it was discovered in the studio session section that the live room and control being separated can negatively affect communication, involvement, and workflow for the musician.
Section 6: Studio Design: Text
3. Location
Section 6: Studio Design: Text
For this section two locations will be compared and analysed to determine which would be a better location for the studio in terms of marketability, budget, and accommodating the clients. (HQstudios, 2021; Robair, 2012) The average price, accommodations, local attractions, and public transport will be compared to determine which area would be best for building a studio within.
Nottingham is the first location to be picked due to it being a city, so it has plenty of local attractions like restaurants, pubs, and activities. It also has plenty of public transport from many different buses running in, round and out of Nottingham daily. As well as a train station. (Visit Nottinghamshire, 2021)
Ilkeston is the next place chosen as despite it being a town, it is easy to access via public transport due to it having busses running from the local cities of Derbyshire and Nottingham. It also has its own train station. It also has pubs and restaurants, it does lack Nottingham’s activities based attractions however but has some such as the bowling alley, golf course, and local park. (Visitderbyshire, 2021)
The cheapest options were chosen, as well as only office and commercial spaces. Ilkeston however only had 13 locations to choose from so a lot of the places that could be appropriate are titled retail property.
The first noticeable difference between Nottingham and Ilkeston is the price, as Nottingham on the front comes out as much cheap as the move expensive place to rent is £210 per month, whereas Ilkeston’s most expensive place is £2,000. But this is due to the size, as the combined size of the Ilkeston property is 2,553.214sqft (square-foot) whereas the Nottingham despite showing the floor plan of the overall office space, it does not mention how much sqft there is available.
This is the trend with the other locations from Nottingham and Ilkeston, the Nottingham locations seem cheaper, but they are actually the price of the smallest amount of property you can rent, whereas Ilkeston shows the price for renting the full space.
Four out of the five locations in the Ilkeston selection are all on Bath street, which is the town centre of Ilkeston, so these locations offer the most direct route to local attractions like pubs, restaurants, and shops. The train station is around 0.7 miles away from bath street, which is roughly a fourteen minute walk. The attractions within the bath street area are a Wilko, Shopping centre, Aldi, and a couple different pub chains.
Only one location out of the Ilkeston section is at a far distance and that is the Hallam Fields Road property, which is 2 miles away from Bath Street. Hallam Fields has a convenience store, a takeaway, and a café.
Whereas with the Nottingham locations they are a bit more spread out,
Egerton Street is one mile away from Victoria Centre.
Roden Street is 0.7 miles away from Victoria Centre.
Oak Street, Carrington is 1.7 miles away from Victoria Centre.
Byron Industrial Estate Brookfield Road, Arnold is 4.2 miles away from Victoria Centre.
Jarodale House, Gregory Boulevard is 1.5 miles away from Victoria Centre.
But it is worth mentioning the attractions near the Nottingham properties,
Egerton Street has two restaurants, an off license, and a hyper market.
Roden Street has a supermarket but is also the closet to Victoria Centre, so it has pick access to all the attractions surrounding and within Victoria Centre.
Oak Street, Carrington has a cake shop, a Lidl, a restaurant and two pubs.
Byron Industrial Estate Brookfield Road, Arnold has an Asda Superstore, a shop, Wilko, Sainsburys, and McDonalds.
Jarodale House, Gregory Boulevard has a Lidl, petrol station, a shop, and a pub.
Nottingham’s main train station is the Nottingham Railway Station, located on Carrington Street, Nottingham. Compared to the Ilkeston train station this is much further out of the way for most of the locations in Nottingham, but it is worth noting that the Ilkeston train station is more a midway point on the way to a proper train station whereas the Nottingham Railway Station is a city station therefore has more trains going other places in the country. (Northernrailway, 2021)
When looking at the size options of these properties, the Ilkeston options are more appealing as all of the options are near to over 1,500sqft whereas within the Nottingham options two of the options are maxed out at 80sqft and one of does not state how much space is offered. But it is fair to mention how the Roden street and Arnold options are maxed out at 29,313sqft and 47,994sqft, this is far too much space than necessary and would be really expensive but it is worth mentioning as any size underneath that will be available so it would give the option to get as much space as needed. And as stated in Everest (2015), the larger room dimensions offer smoother low frequency content. So a larger space is always welcome. (Everest, 2015)
Accommodations or key features are important as they offer more marketability for the studio. (Interview Section; Bell, 2014; Lefford & Thompson, 2018) So it is worth mentioning the accommodating features of the properties mentioned in this location section, it also coincides with the common studio requirements with in terms of disability access. (Long, 2013)
Section 6: Studio Design: Text


Section 6: Studio Design: Pro Gallery
Based on Figure 1 & 2, it is clear that Nottingham offers more accommodating features than Ilkeston. As the Nottingham locations simply has more to offer, such as lifts, disability facilities, disabled toilets, 24 hour access, 24 hour CCTV, and Wi-Fi. And these are important as there are certain common studio requirement that are stated in Long (2013) article, which the Nottingham locations fulfil more so than the Ilkeston properties, a big one being the disability accommodations. (Long, 2013)
Based on the information gathered, the Roden Street location is the ideal location based on the beginning price, it starts at £99 and despite it not stating how much it goes up by, the other attributes outweigh the potential price of the property, as it is the closest to Victoria Centre at 0.7 miles, which means the studio can be marketed to being surrounding by loads of different attractions and accommodations for potential clients, it is also the closest to the Nottingham Railway Station which has already been discovered to offer more location to travel to and from than the Ilkeston Station.
The size options at the Roden Street property mean that in terms of room dimensions there is no worry of being stuck with a tiny room and an unbalance frequency content. (Everest, 2015) and it affords a good amount of accommodations within the facility, such as 24 hour CCTV, lifts, meeting rooms, 24 hour access, this means that the studio has more to market itself off and it covers the disability access with the lift. (Long, 2013; Interview Section).
Section 6: Studio Design: Text
4. Common Studio Requirements
Section 6: Studio Design: Text
In Long (2013) article, the studio requirements are split into two sections, acoustical and functional. The acoustical requirements are relating to the studios acoustic treatment, sound proofing and diffusion. Whereas the functional requirements are more tied to accommodation of the engineers and clients, with access to bathrooms, ventilation, visual contact with control room, storage area and handicap access. (Long, 2013)
Long (2013) states that the requirements are linked to the size of the studio, therefore depending on the size of the studio not all the requirements can be met but this does not mean the studio will be ineffective, just perhaps not streamlined in that area, for example if the client had to go up two flights of stairs to access a bathroom, it is a little impractical but cannot be helped. (Long, 2013)
Section 6: Studio Design: Text
Fig 3, Acoustial Requirements

Section 6: Studio Design: Image
The acoustical requirements are in figure 3, It is will achievable to hit all of these requirements within the space, with perhaps the hardest to achieve being the isolation from the surroundings, but fortunately Roden Street is not a particularly busy street so there would not much noise pollution from the outside. (Google maps, 2021) Due to this the sound proofing method of room within a room might not be entirely necessary, and as stated in soundproofingstore.com, it can cost around £700 to £1,000 per wall to have it soundproofed. (Soundproofingstore, 2020)
Sound proofing can be quite expensive and if it is not entirely necessary then it will not be needed, as long as the live room is far enough away from roads and enough acoustic treatment, and general curtains and other absorptive materials are in the room it will help keep the noise levels down and reduce outside noise. (Everest, 2015)
An NC of below 20 will be achievable with potentially the loudest element in the room being the ventilation, but with the Telefunken 12000 BTU easy-fit DC inverter Wall Split Air Conditioner, which is stated to be suitable for offices and have an ultra-quiet operation then it should be able to offer cool ventilation for the studio while also being quiet enough to fit under the 20 NC, this conditioner sits at £349.98. (Aircondirect, 2021)
Moveable gobos will help solve the requirement is itself and the isolation of different instruments while recording. A gobo was round at Gikacoustics.com, with the freestand acoustic panel 50mm. It comes in at £104 each. (Gikacoustics, 2021)
Section 6: Studio Design: Text
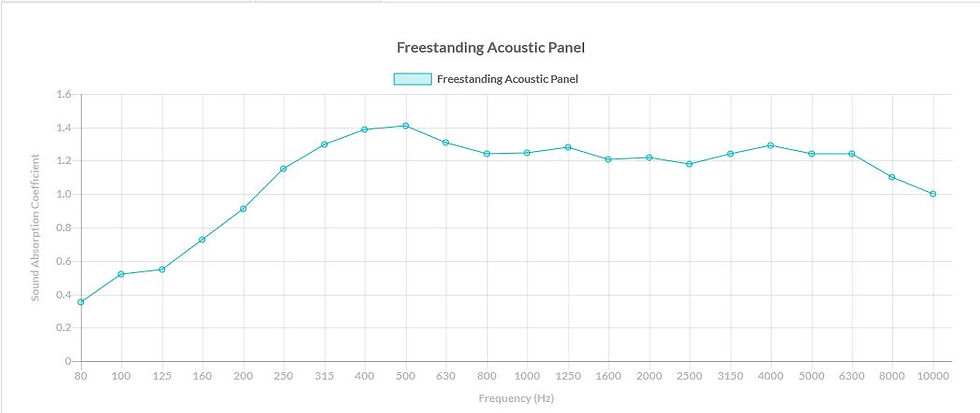
Fig 4, Gobos AC
Section 6: Studio Design: Image
It is worth noting that the absorption coefficients of this gobo is an effective, as shown in figure 4. The AC is above 1.0 from just over 200 Hz which means it absorbs near all the reflections from the sound source. (Everest, 2015)
All of the acoustical treatment will be discussed in the acoustic treatment section.
Section 6: Studio Design: Text
Fig 5, Functional Requirements

Section 6: Studio Design: Image
As mentioned before with the ventilation being a functional common requirement of studios, the rest of the functional requirements are in figure 5. The ventilation and thermal control has already been covered, and according to the Health and Safety Executive website, “suitable and sufficient sanitary conveniences shall be provided at readily accessible places” This means that despite the Roden Street property not stating if it has a toilet, it is a legal requirement to have one so the access to bathrooms requirement is covered. (HSE, n.d)
As discussed previously, the studio will have a studio window to separate the control and live room which will add visual contact with the producer and musician(s) (long, 2013)
Section 6: Studio Design: Text
Fig 6, Studio Window options

Section 6: Studio Design: Image
According to the Soundproof windows website, to have a studio window installed, it would be cost either around £500 or £900, depending on whether it was the studio ultra or ultra+ that was bought, the difference being shown in figure 6, but as stated in the location section, the area is out of the way of busy traffic and people who the studio ultra option will be chosen as there is no need for the extra -11dB in reduction. (Everest, 2015; Soundproof Windows, n.d)
For the next three requirements, being that the building used to be a factory and warehouse and has five floors. There will be enough space to have a storage/ equipment maintenance.
Facility in one for operational structure sake and a private room for the musicians to have their private chats, or to take a break. (Camilleri, 2010; Rightmove, n.d)
The communications area will be built into the back of the control room for operation structure purposes, as this will allow for the engineer, producer, and musicians to discuss the music while also being able to listen to it at the same time as separating this would only make things more awkward if the musicians and/or producer wanted to listen to the music while discussing it. (Camilleri, 2010)
In terms of internet, it needs to fast enough to allow for file transferring, uploading, and downloading on cloud storages and to send to clients and to receive from clients. It also needs to allow more multiple connections at once for the studio computer, phones, and the musician’s devices. Being that uploading will be the main issue when it comes to the internet then an upload speed of 5Mbps or higher will be ideal. (cnet, 2021)
The internet chosen for the premise will be the bOnline unlimited fibre 76Mb download speed, with up to 10Mb upload speed, with it being unlimited it works perfect for situations where everyone within the studio is using the internet on their devices. The contract is £23.78 per month with a £285.35 contract cost, it is also worth noting that it is free activation for new customers. This provider was found by looking at the providers within the postcode of the chosen location. (Moneysupermarket, n.d)
For the last three sections, the Roden Street property comes with a meeting room so it has a conference area, but like mentioned above, the studios control room would be better suited as then the music can be listened to while discussing the music, if it is strictly business then the meeting room will be a better choice but most likely the control room will be a better option. (Camilleri, 2010; Rightmove, n.d)
The building has a lift so any handicapped individuals will have no issues getting around the premise and in terms of cabling, proper cable management will be implemented and since the mixing desk will be following Owsinski’s 27, 38, or 45 percent listening position, so there will be enough room for someone to go behind the desk to get to the cables. (Owsinski, 2013)
Section 6: Studio Design: Text
5. Room Dimensions
Section 6: Studio Design: Text
The room dimensions will be taken from the Rightmove page of the Roden Street property, the available space is 100 to 29,313 square feet, the total amount is too much but unfortunately the Rightmove page does not offer a floorplan or descriptive enough pictures so it is hard to determine which rooms would be best suited for each space. So the plan instead is to determine what the 29,313 square feet is in metres, use the room dimensions excel spreadsheet and and find out how much space will be needed based on the spreadsheet, also the reason to convert it into metres is because the room eq wizard application uses metres. (Everest, 2015; Roomeqwizard, 2018)
29,313sqft is 2723,27sqm (Square Metres), with that amount of total space it gives studio’s control and live room to be rather large. For the control room the room dimensions of L (Length) 3.02m, W (Width) 3.59m, and H (Height) 2.32m where chosen based on the room ratio excel sheet provided by Salford University and Rethority’s website. (Salford University, 2021; Rethority, 2021; Appendix 9)
The Width and Length of the room dimensions were from the dark areas in the graph found in the excel spreadsheet, as stated Salford University (2021), the light and dark areas in the graph show the uneven room frequency combinations (Light) and the balanced room frequency combinations (dark). (Salford University, 2021)
Unfortunately, the room dimensions provided in the excel sheet only have a height of 1 metre which is too short, so Rethority’s website provided the average height of commercial buildings, which is stated to be 7 foot, 6 inches or 2.32 metres. So for simplicity sake the the 2.32m height was chosen. (Rethority, 2021)
Section 6: Studio Design: Text

Fig 7, Custom Studio Control Room
Section 6: Studio Design: Image
Which provided an effective frequency response, shown in figure 7.
This shows that the axial modes are not over lapping so there will be no overly exaggerated modal issues. And since there is a fair few modes it means the frequency content will be smooth. It is not perfect however, as there are big peaks and troughs around the 56Hz, 64Hz, 73Hz, 82Hz, and 95Hz but it is worth noting that this is the room’s frequency content without any acoustic treatment, so with proper acoustic treatment the room should have a much smoother frequency content and not have the big peaks and troughs. (Everest, 2015; Newell, 2017)
For the live room the length, width and height will be 3.08m, 3.79m, and 2.32m. Based on the same sources as before. (Salford University, 2021; Rethority, 2021)
The frequency response does matter in the live room, but it is more about the size, another dark area from the graph was chosen but it is also larger than the control room for the extra amount of space for recording. (Everest, 2015; Newell, 2017; Salford University, 2021; Rethority, 2021; Appendix 9)
Section 6: Studio Design: Text

Fig 8, Custom Studio Live room
Section 6: Studio Design: Image
Figure 8 Shows the frequency of the live room,
The rooms have similar frequency responses due to their similar size, so they share all the same advantages and disadvantages. The live room will be acoustically treated but it will be done differently from the control room as the control room is a place of critical listening and mixing, whereas the live room is a place of recording and is meant to sound nice for the musicians and producer, so the acoustic treatment for the live room will be constructed differently. (Everest, 2015; Newell, 2017; Acoustic Section)
Section 6: Studio Design: Text
6. Acoustic Treatment
Section 6: Studio Design: Text
The previous Acoustic and Acoustic guide sections will influence this section in how the acoustic treatment will be set up for the custom studio.
The first thing to discuss is how the acoustic treatment will be set up, this custom studio’s acoustic treatment will be based on what was discovered with Astonish Audio’s Studio and Snug Recording’s Studio. As Astonish Audio’s studio is heavily absorbed with has resulted in the low end being very smooth, as shown in figure 9. Whereas Snug Recording’s Studio is almost the opposite, as despite having acoustic treatment within their control room it is still rather lively, as shown in figure 10. (Everest, 2015; Newell, 2017)
Section 6: Studio Design: Text

Fig 9, Astonish Audio
Section 6: Studio Design: Image

Fig 10, Snug Recording front side
Section 6: Studio Design: Image
Neither method of acoustic treatment is wrong, as a completely absorbed room allows for only the direct sound to interact with the engineer and with minimal reflected sounds there will be little interference which will reduce confusion in what is being heard. As well on the other side of things, having a more lively sounding control is not a bad thing as it benefits the clients as they need a small amount of reverberation to performance comfortability. (Everest, 2015; Newell, 2017)
So, for the custom studio the control room is adopt Astonish Audio’s method whereas the live room will adopt Snug Recording’s method.
To start with the control room the eBay bass traps product chosen from the Acoustic guide will be used due to the reason mentioned in the acoustic guide section, but the recap; it is to due with its size, practicality, the amount you get for the money, and how much it costs.
Owsinski (2013) online video mentions that bass traps should go from floor to ceiling and since these two of these bass traps are 120cm and other two are 60cm, with the height of the control room being only 2.32m, it covers 1.2m so in order to near cover the entire corners the other two 60cm bass traps can be stacked on top, making the bass traps 1.8m in height. (Owsinski, 2013)
Section 6: Studio Design: Text

Fig 11, Bass trap & Fibre
Section 6: Studio Design: Image
And since the eBay product is only £47.99, it is affordable to buy two sets of this product so each corner to can near completely covered. It will only leave 0.52m uncovered. But as stated in Owsinski (2013) online video, behind the traps, below and above insulation can be used to cover those gaps. (Figure 11; Owsinski, 2013)
As shown on Insulation4less.com, this glass mineral wool material will be £20.92 per piece, and within one pack you get 12 boards. (Insulation4less, 2021)
The overall price to treat the corners of the control room will be £116.9.
Section 6: Studio Design: Text


Section 6: Studio Design: Pro Gallery
The RPG Omniffusor from RPGeurope is being used based on the reasons outlined in the acoustic guide section. The product costs £210.60 and is 59.69cm by 59.69 or 0,587m by 0,587m, will be placed at the rear wall behind the optimal listening position. (Owsinski, 2013)
The reason a diffusor is being placed within the control room is to scatter any sound that arrives to it rather than using an absorber, as it reduces the reflections from the speakers without reducing the reverberation of the room and it adds a musical sound to the room. This is important as listed in Everest (2015) book, the rooms need to be a mixture of lively and absorbed, so it is comfortable for the musicians. (Everest, 2015; Owsinski, 2013)
Figure 14 Shows the diffuser set up in the custom studio.
Section 6: Studio Design: Text
Fig 14, Diffuser

Section 6: Studio Design: Image
When it comes to placing absorbers the best method to achieve a great sounding listening position and environment is to go by the reflection-free zone (RFZ) method, which is where you place the absorbers where the first reflections will be from the loudspeakers which removes the reflections traveling around the room. (Owsinski, 2013)
The way to figure out the points of first reflections is to sit in your listening position and have someone travel around the left and right walls and whenever you see the loudspeaker in the mirror that is where the first reflection will be, Owsinski suggests to place more than just one absorber at that spot to allow the listener to move freely without leaving the RFZ position. This method needs to be done for the ceiling, using the same mirror method. (Owsinski, 2013)
So using the Thomann t.akustik HiLo-N40 panel absorbers selected from the Acoustic guide section and will be placed in the room using the RFZ method, of course it will be difficult to estimate that without taking doing the test, but for the visual aid it will be an estimate of where it will be. (Owsinski, 2013)
The price for 6 of the absorbers is £25.50 with an additional £8 delivery. The size of these absorbers are 100cm, 50cm, and 40cm each, or 1m, 0.5m, and 0.4m each. So these absorbers cover a lot of ground and so very affordable.
Section 6: Studio Design: Text


Section 6: Studio Design: Pro Gallery
It is also worth noting that since the plan is to make a fairly absorbed control room, more absorbers will be placed rather than just the RFZ placed ones, Owsinski (2013) online video states to cover more than 50% of the untreated walls outside of the RFZ area and to place the absorbers on each wall offset from the wall it faces to avoid flutter echoes. (Figure 15; Everest, 2015; Newell, 2017; Owsinski, 2013)
As shown, a total amount 14 panel absorbers coming to £59.90 with additional £8 delivery.
The ceiling will also be treated to follow the RFZ method and covering more than 50% of the room. (Figure 16; Owsinski, 2013)
It also worth noting that the reason for the studio window to be facing the listening position is to fulfil the requirement in Long (2013) article about visual contact between producer and musician. (Long, 2013)
Lastly a standard carpet will be placed on the floor to simply add some more absorption. (Akustik, n.d)
With the eBay professional acoustic foam bass trap, the AC is,
125Hz: 0,25
250Hz: 0,50
500Hz: 0,85
1000Hz: 0,95
2000Hz: 0,90
4000Hz: 0,90
This is the estimation using the data sheet provided via Akustik. (Akustik, n.d)
Section 6: Studio Design: Text
Fig 17, Diffuser AC

Section 6: Studio Design: Image
The diffuser (Figure 17) AC jumps around 0.2 and 0.4, which is fairly inefficient but as stated before, the diffuser has a different role compared to the acoustic treatment as it will mainly scattering the reflections rather than absorbing. (Owsinski, 2013; Everest, 2015; Newell, 2017)
Lastly the absorption panels, the t.akustik HiLo-N40 from Thomann. Unfortunately, the site does not offer the AC but the data sheet by Akustik provides an idea of what the absorber’s AC will be, it is the same material as the bass trap, so it has the same estimated AC,
125Hz: 0,25
250Hz: 0,50
500Hz: 0,85
1000Hz: 0,95
2000Hz: 0,90
4000Hz: 0,90
Section 6: Studio Design: Text

Fig 18, Custom Frequnecy Response post treatment
Section 6: Studio Design: Image
(Figure 18) shows the low end frequency response after the treatment has been put in place, and as it shows the peaks and troughs have been massively reduced which will result in a successful smooth frequency response and effective listening environment. (Owsinski, 2013; Everest, 2015; Newell, 2017) Unfortunately a massive width trough has persisted at the 136.1Hz, but it is not a failure to have one bad frequency in the spectrum, as with that knowledge the engineer and producer and consider that when mixing, it’s a matter of compromising. (Robair, 2012)
Lastly is the doors to the control and live rooms, since the room within a room design is not being implemented the double door system cannot be used, and since buying a new studio sound proofing door is rather expensive. Instead the door will be replaced with a solid core door, like the cottage oak veneer door, this door was chosen due to it being a solid core door and only £99. (B&Q, n.d; Owsinski, 2013)
Then to add some mass a sheet of plasterboard will be added to further add sound proofing, the chosen product is the Gyproc Plasterboard, which is 2.4m, 1.2m, 12.5mm. It was chosen based on its price which is £7.97. (B&Q, n.d)
Figure 19 shows the position of the door,
Section 6: Studio Design: Text
Fig 19, door placement

Section 6: Studio Design: Image
Continuing on with the Live room’s acoustic treatment, the goal is this space is to keep its reverberation while also balancing out the frequency content and removing potential issues like Flutter echo and huge peaks and troughs. (Everest, 2015; Newell, 2017)
The reason for keeping the reverberation within the live room is stated in Everest (2015, pp.172) book, as reverberation adds power to the sound source, it enhances it acoustically. Whereas if the room was dead in terms of reverberation then the sound source will lack that acoustic power and sound softer as a result. It is best to treat the room, so it keeps its reverberation, but it is also under control. (Everest, 2015)
The main pieces of acoustic treatment that will be used is diffusers and some absorber panels, the diffusers will scatter the reverberation which will result in more of a pleasant sound and reduce any strong peaks and troughs. And the absorbers will minimize the reverberation, peaks and trough and will also move any potential flutter echoes. (Owsinski, 2013; Everest, 2015; Newell, 2017)
It is also worth noting that the door for the live room will be the same configuration as the control room and will also have a carpet floor. (Owsinski, 2013; Figure 20)
Section 6: Studio Design: Text
Fig 20, Live room Acoustic treatment

Section 6: Studio Design: Image
This room will be quite expensive, as it has three diffusers, seven panels, and one door. The total coming to £809.62. This is quite expensive, and the majority of the cost comes from the diffusers, but has discovered during the Acoustic guide, they are worthy investment. (Everest, 2015; Newell, 2017: Acoustic Guide)
The ceiling will have three absorbers to further control the frequency content. (Figure 21; Everest, 2015; Newell, 2017; Owsinski, 2013)
Section 6: Studio Design: Text
Fig 21, live room ceiling

Section 6: Studio Design: Image
Fig 22, live room post acoustic treatment

Section 6: Studio Design: Image
It shows the frequency content has been successfully treated, the peaks and troughs have near been eliminated with the only trough will persisting being at 135.8Hz but being that this is the live room the peaks and troughs being completely eliminated is not important as that would result in a lot of absorbers which would remove the reverberation and within the live room is not the goal. (Robair, 2012; Everest, 2015; Newell, 2017; Owsinski, 2013)
And with the diffusers the reverberation will be very pleasant sounding and the musicians will be comfortable to perform their music within there. (Everest, 2015)
Section 6: Studio Design: Text
7. Equipment
Section 6: Studio Design: Text
The equipment section by far will be the most expensive part of this design, and being that a studio is a long term investment; cheaper options for equipment will be the primary focus of deciding on equipment as over time as the studio begins to make more money then more, and better equipment can be purchased but it is a detrimental financial decision to buy expensive equipment to begin with no clientele or without financial income from the studio, it is best to build up to the better equipment. (Walzer, 2016; Burgess, 2008)
Of course the goal of the studio is to be accommodating for everyone, have excellent workflow, have excellent operational structure and be marketable with outboard equipment. So the studio cannot be barren with minimal equipment and accommodating features. (Bell, 2014; Camilleri, 2010; Long, 2013)
To begin with, the Millenium SD-180 N StudioDesk is chosen for the recording workstation due to its features, such as positions for the loudspeakers and spaces below that to put hardware unit in. This helps deduce the costs of needing to buy loudspeaker stands and an outboard rack stand. It also has a pull-out keyboard shelf which helps keeps the station tidy and efficient, adding to the workflow and operational structure of the workstation. (Camilleri, 2010; Figure 23; Thomann, n.d) This desk comes to £279.
To begin with, the Millenium SD-180 N StudioDesk is chosen for the recording workstation due to its features, such as positions for the loudspeakers and spaces below that to put hardware unit in. This helps deduce the costs of needing to buy loudspeaker stands and an outboard rack stand. It also has a pull-out keyboard shelf which helps keeps the station tidy and efficient, adding to the workflow and operational structure of the workstation. (Camilleri, 2010; Figure 23; Thomann, n.d) This desk comes to £279.
The Flintan chair is a standard office IKEA chair, chosen primarily based on its price compared to quality. Three of these chairs are needed for the producer, and for the musician(s) and engineer. As to save on money, a two seater sofa was chosen for the rear end of the room but that meant if the band were bigger than two members then they would have to either stand or sit on the floor. Which is not ideal when running a professional studio and goes against the accommodating nature of the studio. With acquiring three chairs the cost will be £210. (Long, 2013; Lefford & Thompson, 2018; Bell, 2014; Camilleri, 2010; Iverson, 2017; Shepherd, 2011; Figure 24; Ikea, n.d)
Up next is the computer, as discovered in the literature review, with a computer the main important elements are the processer, hard drive space, and ram. (Lau, 2012; Woszczyk & Leonard, 2012).
So with this in mind the computer chosen as it offered the best in those areas at a reasonable price. The computer is HP M01-F1014na Desktop PC. This PC offers a 1TB HDD (Hard Disk Drive), 8GB of DDR4 ram and an Intel core i3-10100 processor. It also comes with a keyboard and mouse which helps save money, this desktop is £399. (Currys, n.d; Figure 25)
The additional features is,
Internal Wifi
Ethernet port
Bluetooth
USB 3 x 4
USB 2 x 4
3.5mm Jack x 2
Avid, Pro tools developer, recommends Windows 10, Intel i5 processor, 16GB of ram and 15GB hard drive space. (Avid, 2021). Ableton also recommends Windows 10, Intel Core i5 Processor or equivalent, 8GB of ram, 84GB of hard drive space. (Ableton, n.d)
As shown on userbenchmark.com, when comparing a i5 processor compared to the i3 processor that is within the chosen computer, we can see that the i5 is only +4% more effective than the i3, and despite this the i3 processer has a 70% rating on workstation use and a 87% on desktop use. This proves that despite it not being an i5, it is not unusable with these two DAWs. (Userbenchmark, n.d)
When it comes to the ram the computer fulfils this recommendation set out by Ableton but fails to match the Pro tools one, A reddit forum states that it can run with 8GB no problem but being that pro tools is expensive, coming at £249 for a yearly subscription. It is not worth purchasing with the potential of not being able to run it correctly. Therefore another DAW will be used, and that being Reaper as it is a free DAW and only requires Windows XP/Vista/7/8/10 (32 or 64 bit) which is very simple to run, and the computer will have no problem running this DAW. (Reddit, 2019; Reaper, n.d)
The last piece needed to accompany the desktop is a computer monitor, this monitor was mainly chosen for its price. But it is a Full HD 1920 x 1080p monitor, with a HDMI input and the option to be wall mounted. The only requirement this monitor needed to fulfil is Ableton’s minimum 1366 x 768p display resolution which this monitor fulfils completely. This monitor comes to £99. (Currys, n.d; Ableton, n.d; Figure 26)
For the rear end of the room, a two seated sofa will be placed to accommodate the musicians and clients of the studio, and allow for a more comfortable environment, it also allows for the producer and clients to discuss the music while in the control. (Bell, 2014; Camilleri, 2010; Long, 2013)
The Klippan was chosen for its price, as it is only £179. This will improve the workflow and operational structure of the studio and it will also make the musician feel at ease as it will offer them comfort. (Bell, 2014; Camilleri, 2010; Long, 2013; Lefford & Thompson, 2018; Harrison, 2014; Thompson & Lashua, 2014; Ikea, n.d; Figure 27)
Now that the desk, seats, and computer are setup. It is time not to start adding in the production equipment.
For starters the DAWs, as discussed above, pro tools and ableton were originally chosen but after discovering the PC cannot run pro tools correctly and being that it is an expensive yearly purchase, it was decided to instead replace pro tools with reaper.
Reaper is a £43.43 or £162.88 depending on which license is chosen, but reaper has a cost effective feature with that being that you can download a demo version for free that is supposed to last for 60 days but seems to go on forever. This demo version is the same as the licensed version. But despite it being basically free, it is still worth purchasing due to it being an effective DAW for recording, and general audio production. (Reaper, n.d) Due to this, in order to save more money only Reaper will be the DAW for this studio. (Lefford & Thompson, 2018)
Due to the computers low tier components, reaper is an ideal DAW for production due to being very light in terms of requirements to run it. It is also capable of multi-channel recording which is ideal for the studio being that the goal is to be able to record a multitude of different types of musicians/ bands. (Reaper, n.d; Pcmag, 2019)
Unfortunately, reaper expects the user to bring their own third party virtual instruments and loops but it does make reaper very small to download which is nice as the plan to get a bunch of third party vsts and hardware effects so the lack of vsts and loops is counteracted. (Reaper, n.d; Pcmag, 2019; Figure 28)
The Alesis Q49 MKII 49 Key USB MIDI Keyboard Controller is chosen to fulfil the studios goal of being accommodating for every situation/ want from the clients. If the client wants to record some midi vst instruments or produce a hip hop track in the studio then that should be made possible. And with this keyboard it offers them the option to play the parts they want for their composition rather than drawing into the DAW. It was mainly chosen for its price and the amount of keys it has, the price is £74.99, and it has 49 keys which gives the musician range to play the lower octave notes while playing the main melody. (Andertons, n.d; Interview section; Figure 29)
To add to the midi keyboard and music production element of this studio. The Rob Papen Urban-X Bundle was chosen as it offers a selection of vst instruments and plugins once the product has been registered. The bundle comes to £41.95 (Andertons, n.d; Figure 30)
The bundles offers, (Robpapen, n.d)
SubBoomBass-2, a bass vst plugin famous for its sound and multitude of preset options, it also offers plenty of parameters to create your own present bass sounds.
Punch-2, A drum synthesiser, sampler, and sequencer. Offering variety and options how people program their drums.
Punch-BD, Another drum synth, which offers plenty of options to edit the drum sound and create something unique.
MasterMagic, an enhancer designed to be applied at the end of the mastering chain and it gives the track an extra bit of texture and colour.
RP-AMOD, a multi effects unit; it houses phase, flanger, chorus, ensemble, and a tremolo. It has a tempo sync feature which when applied will put the effect in time with your music. This plugin is free of charge for when someone purchases one of the other Rob Papen plugins.
For marketability and to offer this studio some uniqueness, the Behringer Virtualizer 3D FX2000 Multi Effects Processor and dbx 266XS Dual Compressor/Gate/Limiter were chosen for the hardware units for the studio.
The Virtualizer 3D was chosen due to it being a multi effects unit and also only costing £105, it offers 100 factory presents as well as 7 adjustable parameter options and a 2-band EQ for per effect.
The dbx 266XS was chosen for being a Compressor, gate, and a limiter all in one at the price of £105. With these two hardware unit, the studio will have that creative processing discovering during the interview section and will also add to the marketability of the studio as now it can be mentioned what this studio has to offer on its website page. (Interview Section; Walzer, 2016; Burgess, 2008; Wilson, 2011; Figure 31; Figure 32)
One of the main pieces of kit for the control room, the mixing desk and for this piece of kit the Yamaha MG16XU 16-Channel USB Mixing Desk was chosen as it offers exactly what the studio needs for a reasonable price of £380.
It offers,
16-Channel Mixing Console
Max. 10 Mic / 16 Line Inputs (8 mono + 4 stereo)
4 GROUP Buses + 1 Stereo Bus
4 AUX (incl. FX)
“D-PRE” mic preamps with an inverted Darlington circuit
1-Knob compressors
High-grade effects: SPX with 24 programs
24-bit/192kHz 2in/2out USB Audio functions
+48V phantom power
XLR balanced outputs
With this mixing desk it will allow the studio to be able to record a total of 16 microphones at once which will cover a vast majority of projects, there will be instances where this will not be enough but as mentioned in Robair (2012) article and in the interview section, compromise is a necessity and limitations can lead to creative solutions. It is also worth noting that it has its own built-in preamps therefore saving money on needing to buy a preamp unit. (Robair, 2012; Interview Section; (Bell, 2014; Camilleri, 2010; Long, 2013; Figure 33)
For loudspeakers, the Yamaha HS7 Matched Pair Active Studio Monitors were chosen for their frequency content and price. As the frequency is 43Hz to 30kHz which means near the entire frequency content is cover minus 20Hz to 42Hz and with the addition of the subwoofer it means all of the frequency content will be properly represented. (Andertons, n.d; Yamaha, n.d)
The loudspeakers may seem expensive being that there are priced at £399 which is more than the mixing desk its self but the reason this is cost effective is because loudspeakers are sold separately, so in order to get the left and right speakers you will need to buy the product price. An example being the Focal Alpha 80 Active Studio Monitors on Andertons, it is £279 per speaker, overall coming to £558, an extra £159. (Andertons, n.d; Figure 34)
A sub-woofer will be used in the studio as it offers accurate low end representation, as it can properly represent the low frequencies without pushing itself like regular studio monitors have to. (Producerhive, 2021) It is worth mentioning the loudspeakers will be positioned in the equilateral triangle for the best sonic representation from the loudspeakers. (Robair, 2012; Everest, 2015; Newell, 2017)
The Yamaha HS8S Active Sub-woofer was chosen for its frequency content. As it offers a frequency response of 22Hz – 150Hz which means the frequency content in that area will be fairly represented by the sub-woofer and will further improve the quality of the mixes that are produced within the studio. It comes to £399 (Andertons, n.d; Producerhive, 2021; Figure 35)
Since all the equipment for the control room is secured, the next step is to discuss the equipment for the live room. But before this can be done, it is worth mentioning a necessary piece of equipment, the AD/DA converter, the AD standing for analogue to digital and the DA standing for digital to analogue. This is needed to convert the analogue signal from the microphone and preamps into a digital signal for the computer, then to convert that digital signal back into an analogue signal for it to be played through the loudspeakers. (Wurth, 2017; Figure 36)
Unfortunately a lot of converters are very expensive, so the RME ADI-2 FS 2-Channel AD/DA Converter was chosen due to it being a AD and DA converter in one for an affordable price, compared to other converters, of £609. With this piece of kit the sample rate can be set to a maximum of 192kHz which means the quality of the recordings can be very high. (Wurth, 2017; Scan, n.d; Figure 37)
With all the control room equipment discussed and arranged. It is now time to move on to the live room equipment. The first piece of equipment is the stagebox, this is a device that allows for the microphones to connect to the mixing desk, It is a the middle man for the microphones and mixing desk. It will sit within the live room and the output cable will travel into the control room where it will be connected up to the mixing desks inputs. (Evens, 2011)
The Omnitronic MUS-820 8 Channel Stagebox, two of them will needed as it is only an 8 channel stagebox and for the studio setup 16 are needed to be able to be fully accommodating for most situations. With the cable being 20m it will have no issue getting in the control room. The price for two of this product comes to £138. (Gear4music, n.d; Bell, 2014; Camilleri, 2010; Figure 38)
For the microphone stands two types will be needed to be bought, fourteen of the Hercules Stage Series Mic Stands, which are the standard length microphone stands, this one sat at 1475mm fully lengthened. And two of the Tourtech Tts-mi0804bk Low Profile Telescopic Boom Mic Stand. This will be done as the two low profile microphones stands will fit better when recording a kick drum, the underneath of a snare, or a amplifier, tall microphone stands can do it too but with a little more effects and with less room due to their size, this is mainly in reference to kick and under snare recording but this argument can still be applied to amplifier recording, this will mainly help with workflow and freedom for creativity. (Bell, 2014; Camilleri, 2010; Lefford & Thompson, 2018; Hewitt, 2015; Andertons, n.d; Andertons, n.d)
The tall Hercules Stage Series Mic Stands will come to £349.86, and the short Tourtech Tts-mi0804bk Low Profile Telescopic Boom Mic Stand will come to £29.98, with a total price of £379.84. The lowest price was chosen since a lot of the microphone stands will be needed to fulfil the accommodating and excellent workflow of the studio. (Bell, 2014; Camilleri, 2010; Figure 39; Figure 40; Andertons, n.d; Andertons, n.d)
Next is the pop shield, a necessity for recording vocals. As this removes and reduces plosive type words like pick, brick, and public; basically any word that has a B or P in it are the worst offenders, this is due to way our mouths form the word as it when the letter is spoken a burst of air shoots out which the microphone will pick up and disturb the recording. (Hirsch, 2016)
The sE Electronics Dual Pro Pop Shield Screen is chosen due to it having two different types of materials for both pop shields that allow for more versatility when recording different types of vocals, they can also be doubled up to further reduce the plosives in the vocal performance. The price for this product is £29, a reasonable price for how versatile it is. (Hirsch, 2016; Andertons, n.d; Bell, 2014; Camilleri, 2010; Figure 41)
Next is the Stagg Male to Female XLR Mic Cable, this product was chosen for the length of the cable and the price. As the cable length is 3m so it will have no problem going across the room, which is not much of a problem as XLR cable but being that it will reduce the amount of overall cables it is best to get a cable that can reach across the room. And the price for a single cable is £6.99 but in order to have the right amount of cable for each input, 16 cables are needed, which brings the price up to £111.84. Having this many XLR cables will allow for the total amount of inputs on the desk to be used so a large ensemble can be recorded at once if that is there preferred, further enhancing the accommodating goal of the studio. (Andertons, n.d; Bell, 2014; Camilleri, 2010; Figure 42)
Next is some headphones for the musicians while they are in the live room so they can hear what they are recording to, hear a click track, and/ or hear themselves. (Owsinski, 2012). The main elements necessary for the headphones is to make sure they are in good condition. (Owsinski, 2012) So due to this price is the main contributing factor into what are chosen, especially since five are needed for a maximum of five musicians.
The Behringer HPM1000-BK Headphones were chosen as they £9, which is very cost effective since five of them are needed, this brings the total cost to £45, with its oval-shaped ear cups it will sit comfortably on the musicians head allowing them to wear them for a longer period of time. (Andertons, n.d; Owsinski, 2012; Figure 43)
A headphone amp will be needed for the headphones to be plugged in to, and to control the level of each individual headphone, it will also give the mixing desk and/ or DAW the control the send signals to the headphones, this will allow for the producer to provide the musicians with their own individual mixes for their headphones. (Owsinski, 2012)
The Behringer HA8000 V2 headphone amp was chosen for its price and capabilities. As it is a 8 individual stereo channel amp with the capable of doing mono or stereo mixes per channel. This is effective as the price for this product is £111 which is an affordable price for piece of kit such as this. It also has extra headphone inputs so if more clients come and they have their own headphones then they can plug in as well, it also gives the producer the chance to do some microphone position listening while in the live room. (Owsinski, 2012; Thomann, n.d; Figure 44)
A rack stand will be bought with it to hold it up, so it does not have to rest on the floor. That costs £11.99 (Andertons, n.d; Figure 45)
A DI box is needed for when recording bass, but it also gives options for reamping with bass and guitar if necessary, again supplying the creative freedom and accommodating nature this studio is going for. (Bell, 2014; Camilleri, 2010) The Subzero Active DI box was chosen for being an active DI box and for its price as it comes to £19.99 and since it is active it uses an internal power supply to power itself negating the need for a extra power cable. (Gear4music, n.d; Figure 46)
Last for the equipment is the microphones. There are three common types of microphones,
The dynamic
The Condenser
Figure 46
The Ribbon
The ribbon will not be considered for the studio as the dynamic and condenser microphone are generally much cheaper and the ribbon is best for adding extra timbre to the recording, despite the ribbon being good for marketability. The dynamic and condenser microphone options will be best to get, and the ribbon will be best for when the studio has had time to develop and earn some money. (Wurth, 2017; Walzer, 2016; Burgess, 2008)
Dynamic microphones have a magnetic coil that picks up the sound waves, it is generally heavy so high frequency sound waves do not get picked up as well due to them having less energy than lower frequencies. Dynamics are quite durable and generally have a high SPL level so they can handle louder instruments much better than condenser and ribbon microphones. They are best for drums, vocals and electric bass and guitars. (Wurth, 2017)
A condenser microphone has a smaller circular plate that is more delicate compared to the dynamics therefore it has a lower SPL so it does not need as much volume to pick up the sound waves, it therefore can pick up high frequencies better but cannot handle high volume instrument as good as dynamics. Condenser microphones are best used on vocals and acoustical instrument due to their width frequency range and sensitive input, but it can be applied to many instruments like bass, guitar, drums but may need a pad or have a lower gain setting than dynamics. (Wurth, 2017)
A total of sixteen microphone will be needed to make use of all 16 inputs on the mixing desk and to allow for a large ensemble to be recorded at once. (Bell, 2014; Wurth, 2017; Camilleri 2010)
First lets cover the dynamic microphones, the microphones chosen are, (Thomann, n.d)
Shure SM57 LC x 2, £79 each.
Shure SM58 LC x 2, £85 each.
t.bone MB 88U Dual x 4, £33.
Behringer XM8500 x 4, £13.80.
These microphones were chosen for their marketability, price, and effectiveness. The Shure Sm57 and 58 are both famous microphones for their price, durability, and quality so it was a good option to pick them as they will offer the studio a marketable tool by listening to them under its equipment. The other two microphones were chosen primarily for their price as they really affordable microphones. (Thomann, n.d; Wurth, 2017)
Here are the specifications for each of the dynamic microphones, (Figure 47; Figure 48; Figure 49; Figure 50)
They all have similar patterns, with them being fairly flat until it passes the 1kHz, at that point it raises and then comes a lot of peaks and troughs until an eventual dip. The Sm58 has the best frequency content as it goes up to 20kHz as it begins to dip, whereas the rest of them all drop around 15kHz and 16kHz. This does not make the other microphone bad in comparison to the Sm58, as it has been discovered that dynamics are generally not good at picking high frequency content. (Wurth, 2017; Shure, n.d; Shure, n.d; t.bone, n.d; Behringer, n.d)
All these microphones show in their specifications that they are good quality microphones, they will supply with whatever they are recorded with a nice timbre and texture, which adds to the marketability of the studio and also the versatility, as since 12 dynamic microphones are being bought for the studio, if the Sm57 is not working tonally on an instrument, it can easily swapped out for another dynamic to find that right tonality. (Wurth, 2017)
The overall price for the dynamics is, £515.2.
Next is the condenser microphones, the chosen are, (Andertons, n.d)
Audio-Technica AT2020TYO Limited Edition x 1, £85.00.
Behringer C2 Pair x 1, £39.99.
Mackie EM-91C x 1, £67.00.
Behringer C-1 x 1, £34.99.
These microphones were chosen based on their price, marketability, practical applications, and specifications. As shown above none of these microphones are particularly expensive which is beneficial since it helps save money and since the goal is to not go bankrupt from the initial days of the studio opening, these purchases will help this as it will supply high quality condenser microphone that do not cost a lot. (Wurth, 2017; Walzer, 2016; Burgess, 2008)
The main one that is marketable is the Audio-Technica AT2020TYO Limited Edition, being that it is a limited edition microphone, and a well known brand so it will be an effective marketing strategy to have this listed at the top of the microphones page on the studios page. (Lefford & Thompson, 2018; Bell, 2014; Camilleri, 2010; Iverson, 2017; Shepherd, 2011)
The practical applications of these microphones are as follows, (Wurth, 2017)
Audio-Technica AT2020TYO Limited Edition used primarily for vocals, guitar (electric & acoustic), and bass.
Behringer C2 Pair used primarily for overheads for the drums.
Mackie EM-91C used primarily for vocals, guitar (electric & acoustic), and bass.
Behringer C-1 used primarily for vocals, guitar (electric & acoustic), and bass.
It is worth stating this is the based on the typical type of instrument recorded mostly, of course these microphone can be used on many different applications, but it is worth stating their primary use mainly based on their design and specifications. (Wurth, 2017; Slideshare, 2012)
The Audio-Technica microphone will be the primary vocal microphone due to it being a cardioid microphone that has a 20Hz to 20kHz frequency response, this means that the vocalist’s unique vocal timbre will be captured in full, and the microphone will not remove any characteristics of the vocalist’s timbre. (Andertons, n.d)
The Behringer C2 microphone pair will be primarily used for drum overheads mainly due to it coming in a pair, as since they are a pair they have the same specifications and thus will sound very much the same, and this is effective as it will have the same polar pattern and stereo image which is important for recording drum overheads as if they are different then the drums may sound one sided, or too different when listening to the left and right overhead tracks which can cause confusion as it will not sound like one big drum sound but rather a compilation of a bunch of drum sounds. (Shure, 2013)
The Mackie EM and Behringer C-1 condenser microphones are similar to the Audio-Technica microphone in terms of its usage, but minus when as marketable and being secondary options for vocal recording, as these microphones will be mainly used to record electric guitar, acoustic guitar, and bass, plus any other instrument. For no particular reason other than for marketability, as the Audio-Technica as a certain alure to being that it is an interesting colour and being that is it limited edition so when taking photos for marketing the main microphone want to seen is the Audio-Technica to draw in any viewer of the images to the interesting blue microphone, instead of just a standard black or white microphone. (Wurth, 2017; Walzer, 2016; Burgess, 2008)
Of course it is worth noting that when recording any microphone maybe used for any instruments as perhaps the vocals sound better on the Mackie microphone over the Audio-Technica. Or maybe even a dynamic depending on the vocal style. (Interview section; Lefford & Thompson, 2018; Bell, 2014; Camilleri, 2010; Iverson, 2017; Shepherd, 2011)
Condenser microphone specifications,
Audio-Technica AT2020TYO: Polar Pattern: Cardioid, Frequency Response: 20 - 20,000 Hz (Andertons, n.d)
Behringer C2 Pair: Polar Pattern: Cardioid, Frequency Response: 20 - 20,000 Hz (Behringer Malaysia, n.d)
Mackie EM – 91C (Figure 51; Mackie, 2019)
Behringer C-1: (Figure 52; Behringer, n.d)
The overall price for these condenser microphone is £226.98.
Section 6: Studio Design: Text


Section 6: Studio Design: Pro Gallery
Conclusion
Section 6: Studio Design: Text
This studio is a success, for each section within this work it is effective and makes good use of each section to develop a hybrid studio. But it is interesting to note that this studio is more heavily based on a commercial studio than a home studio, this will be due to home studios heavily basing its own design on commercial studios except for being a cheaper design with potential for acoustical issues and a lack of an accommodating design approach and effective operational structure. (Wilson, 2011; Long, 2013; Interview Section; Studio Session Section; Bell, 2014; Camilleri, 2010; Everest, 2015)
The main elements based on home studio that commercial studios have now adopted is more of a in the box design approach to effect units, one person running the studio and a more relaxed environment with everything close by and minimal choice paralysis. (HQstudios, 2021; Science of People, n.d; Robair, 2012)
But despite this hybrid studio being more based on a commercial studio design with it being not a home or bedroom studio, it still brings all the advantages of home and commercials studios into one studio design. In theory this studio should be able to deliver the professionalism that commercial studios deliver while also not feeling too intimidating and more relaxing like home studios. (Lefford & Thompson, 2018; Bell, 2014; Camilleri, 2010; Iverson, 2017; Shepherd, 2011; Thompson & Lashua, 2014; Harrison, 2014).
With the marketability it was a complete success, based on the design and equipment choices this studio made it will be able to accommodate a lot of different types of ensembles with only the more obscure ensembles like plus 6 pieces groups and a full orchestra. (Bell, 2014; Lefford & Thompson, 2018)
The operational structure was also a success as the studio’s design is primarily based on this and being that a lot of the effects are software based it is quite within arms reach to be able to apply an effect, this also goes for the equipment as the microphones and microphone accessories will be in the live room meaning they are also at arm’s reach, resulting in a fast and productive workflow. Also since the building that the studio is built within offers a lot of space then acquiring all the other different spaces necessary is easily achieved. (Camilleri, 2010; Long, 2013)
An effective location was chosen for the studio as the Roden Street property offers a lot of space and hits all the requirements needed to build this studio as effective as it possibly could be. (Robair, 2012; HQstudios, 2021; Long, 2013; Interview Section)
The common studio requirements acoustical section was a complete success since all the requirements were hit which will result in this studio being as effective as possible acoustically which will mean it will deliver great recordings and be an effective critical listening environment. (Robair, 2012; Everest, 2015; Newell, 2017; Long, 2013)
The studio is also a complete success with hitting all the requirements within the functional section of the common studio requirements, this means that it is also an effective business and accommodating everyone who may want to book a studio session. (Long, 2013; Lefford & Thompson, 2018)
The room dimensions are successful despite its troughs within the lower frequencies, as despite those the frequency content is still fairly smooth, and this is pre acoustic treatment. It is also large enough to accommodate a full band recording in the live room without workflow issues of not enough space. (Camilleri, 2010; Everest, 2015; Newell, 2017)
The acoustic treatment for the live room and control are successful, even with glaring issues such as the persistent trough in the lower frequencies. But despite this the rooms will still deliver an excellent sounding listening environment and as stated within the acoustic treatment section, as long as the engineer and producer who of this trough then they can work around it. (Owsinski, 2013; Everest, 2015; Newell, 2017; Robair, 2012)
The equipment is also a success, a very expensive section compared to the rest but a necessary purchase as it will allow the studio to fulfil its goal of being an accommodating for everyone type set up with excellent workflow and operational structure. (Walzer, 2016; Burgess, 2008; Bell, 2014; Camilleri, 2010; Long, 2013; Lefford & Thompson, 2018)
The overall price of the studio is, £7,745.10. This seems like a lot of money but compared to what Rick Camp and Mike Johnson stated in RecordingConnection.com is it really cheap, as they state that a home studio could be from 400 to 10k, 20k or even 30k, and also state that commercial studios can start around 40k, 50k or up to a million plus. (Recordingconnection, 2021)
So based on this the studio build for this section was a complete success in being on a smaller budget but still fulfilling its goals. This is especially impressive since this studio is mostly a commercial studio than a home studio. (Recordingconnection, 2021; Lefford & Thompson, 2018; Bell, 2014; Camilleri, 2010; Iverson, 2017; Shepherd, 2011; Thompson & Lashua, 2014; Harrison, 2014; Bell, 2014; Hidalgo, 2013; Watson, 2013; Burgess, 2008; Long, 2013; Robair, 2012; Walzer, 2016; Wilson, 2011; Herbst & Albrecht, 2018).
Now to show the overall design of the studio with the equipment in place, (Figure 53; Figure 54)
Section 6: Studio Design: Text


Section 6: Studio Design: Pro Gallery
bottom of page